Posted by Tara Woodbury
on May 03, 2013
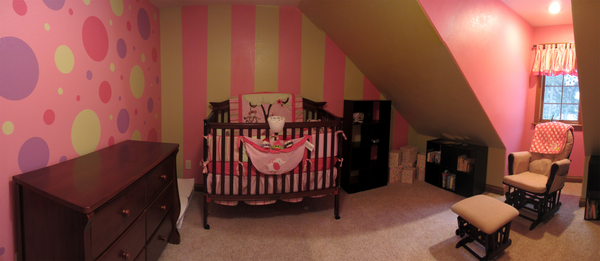
Jeremy and Megan, who live in Trempealeau, Wisconsin, welcomed home their first baby girl on April 20, 2013. In anticipation of her arrival, they set out to create a beautiful nursery mural; after searching Google for different ideas for nurseries, they found My Wonderful Walls and chose our Polka Dot Wall Mural Stencil Kit. Although they looked into wall stickers, Jeremy and Megan decided that painting would leave them with a huge sense of accomplishment and a feeling of pride that they did something so amazing for their daughter. They were also excited about the chance to spend time together on a special project before bringing their new little bundle home to stay.
Jeremy really put a lot of time and effort into this project for his little girl. He describes himself as creative, but not necessarily artistic. He works as a 'computer guy' and knew he needed to do some pre-planning before slapping some paint on the walls. Being a tech-savvy fellow, he created a digital image of the baby’s room and used his computer skills to lay out where each polka dot would go.
Megan put in a ton of effort and thought to the project as well. In fact, once the polka dot stencil kit arrived, Megan took the initiative to cut out nearly 100 colored dots with construction paper, placing them on the walls exactly where she wanted Jeremy to paint them.
In order to prepare for the project, Jeremy checked out our online videos on how to use the stencils while he was waiting for the kit to arrive. Overall, their experience was great, and the couple was anxious to share the new space with their darling baby.
Since they have textured walls, the duo had to get creative with how they applied the paint so it would look polished and crisp once dry. For others looking to replicate their painting process, Jeremy recommends that you place the stencil on the wall and paint the base color on the inside edge of the stencil to create a seal. Once that dries, go ahead and paint the polka dot the color you wish and let it dry, then peel the stencil away. This will provide you with a perfectly shaped and sealed circle, thanks to the coat of base paint on the inside edge.
Jeremy also jokingly recommends not putting up so many dots, as it made for a long day and a long process. However, he does admit that he absolutely loves the room and wouldn't change the design he and his wife brought to life in any way.
Together, it took Jeremy and Megan one day to create all of the polka dots, and another two days to add some stripes, which Megan's father helped with. Before baby had even seen the room, they posted many pictures on Facebook and their friends have all commented on how impressed they are at the finished room.
Thanks Jeremy and Megan for sharing your wonderful, heartfelt room makeover with us, and congrats on your bundle of joy! To all our My Wonderful Walls readers, if you enjoyed reading this customer spotlight, please leave a comment below.