Posted by Tara Woodbury
on November 05, 2013
Many of our My Wonderful Walls wall stencil kits come with clouds. You can also purchase a Simply Clouds stencil kit in either whimsy or traditional for just $27.99 with a set of 5 clouds each or individual cloud stencils. You can even use the technique shown with other stencils, we just can't guarantee the results and you may need additional supplies. Once you are ready to add the clouds to your wall, you’ll want to gather your supplies. You will need:
• Acrylic White Paint
• Blue Base Coat (same paint you’ve used for the background sky)
• Paper plate to put your paint on
• Bristle Brush
• Foam Brush
• My Wonderful Walls Self-Adhesive Cloud Stencils
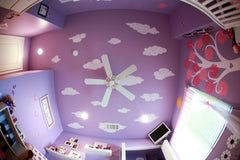
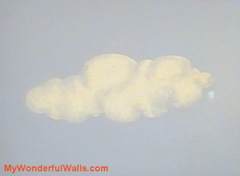
Assuming you have already applied a basecoat to your walls (we recommend using Spring Waterfall A54-3, Olympic, semi-gloss or satin from Lowe’s for the classic sky you’ll see in many of our images)you will first paint a cloud using the large cloud stencil. Our wall stencils are adhesive so simply press to the wall and rub it with your hand making sure all the inner edges are down. Dip your foam brush into your acrylic white paint. The trick is to not use too much paint or it might bleed under the stencil. Use a stabbing or patting motion to paint, particularly around the edges. Using a back and forth motion could cause the paint to work its way under the stencil. You can generally get a good result with two coats of paint. Once the paint is semi-dry you can remove your stencil and move on. You may use a hair dryer to speed things along. Our stencils can be used and re-used several times just make sure they are clean and dry in between uses.
Now to add some variety and texture to the cloud you can actually layer a second cloud stencil over the first one you’ve painted to make a larger cloud and then add dimension with a bristle brush. First, apply a smaller cloud stencil overlapping the cloud you’ve just painted. Use the same technique as above to paint this cloud. You can add a third layer on the other side to make an even larger and unique shaped cloud as well. If you are going to be adding several clouds to your kids room mural, this will prevent your clouds from looking repetitive. Once you have the size cloud you want, add some texture and depth by dipping your bristle brush into your blue base coat paint. Working around the edges of the cloud, you can add shadows with the blue paint to blend your cloud into the sky. Add more blue throughout the cloud with a light hand to create a realistic looking cloud. That’s it! You’ve now created a cute little cloud for your kid’s room or baby nursery.
Watch this How to Paint with the Simply Clouds Stencil Kit where Michael demonstrates just how easy painting clouds into your mural can be! Let us know below if you have any tips to share on how to paint the clouds in your kids room mural.