Posted by Tara Woodbury
on December 11, 2015
We love getting pictures of My Wonderful Walls products in people’s homes and businesses and when our customers share their experiences, they often have the best tips for using our wall decals and stencils. So while we have a lot of helpful information on using our products available in our FAQ and video tutorials we thought we’d share some of our favorite customer tips for using our wall mural stencils or wall stickers from the last five years. Here’s a sampling of what our customers have shared about everything from how to stencil a textured wall to how to plan your wall mural effectively! And make sure you take advantage of code GIVING25 through 12/14 to save 25% on all wall decals and stencils.
Our walls are knockdown texture, which made stenciling a major challenge. We found success in using clear caulk on the stencils before painting the area within them. After removing the stencils and allowing the art to dry, I retouched the edges for a super crisp look. It took a lot of work but made such a difference in the finish. – Dan and Ange, Lone Tree, CO
We purchased both paint brushes and sponge tip brushes, but because of our textured walls the paint brushes did not work well and the paint leaked behind the stencil. The sponge brushes were great. - Brenna and Todd, Windermere, FL
I would definitely buy the paint kit. It takes the guess work out of figuring out what colors look good together. It saves so much time and there was plenty of paint left over. – Pauline, Las Vegas, NV
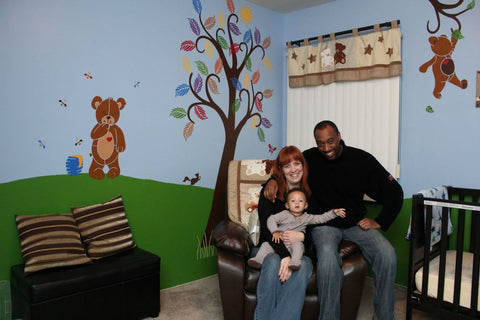
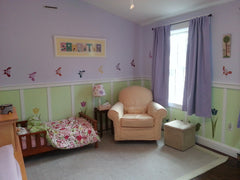
To re-create the forest theme scenes uniquely on each wall, we pulled the stencils off the walls while the paint was still wet, and then cleaned off the stencils with baby wipes. While it didn't completely prevent paint build-up, it did make it possible to re-use the stencils many times and in different ways. – Stephanie and Scott, Maine
Definitely follow the instructions and use light dabs of paint on the stencils. We poured very small amounts of paint on the edge of paper plates and on the first coat we dabbed the sponge brush almost completely dry on the paper plate before applying. Don’t be afraid to use too little paint until you get comfortable with the process. – Chris and Jennifer, Melbourne, FL

We found the wall decorating process to be fun and stress free. We would tell other couples looking to stencil their walls not to sweat the small stuff. There are no rules when it comes to creativity, and this applies to My Wonderful Walls stencils as well. – Michele and Vinny, New Jersey
Buy lots of brushes it saves so much time cleaning and washing, we bought 3 packs for 2 rooms’ worth of stencils. Also, the background color doesn't have to be too perfect but keep some back, we found that occasionally the stencil peeled a little of the background paint off, keeping some paint back meant we could quickly touch up. Colors don't have to match completely but take time to check you have alternatives for all colors, we used Dulux mix your own paint for our background colors. – Amy and Matt, Surrey, England, UK
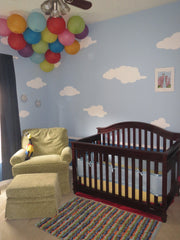
When you lay the stencils make sure they are completely flat with no bubbles. Also, we used chalk to outline where we wanted the clouds to go. – Patricia and Judah, Alabama
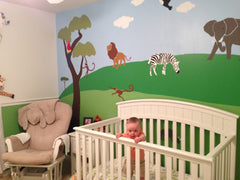
The stencils may bleed a little bit. To give a more crisp finish, take a fine brush and outline all of the animals and plants. – Katie and Bryan, Collegeville, PA
Be sure to purchase Spray Mount Artist's adhesive if you're going to reuse the same stencil many times as the "sticky" it comes with does wear off. – Wendy
If you have a thin line on your stencil - use very little paint. Sometimes the lines bleed together. If they do, tear the cotton off of a Q-Tip to make it thinner, dip the stick in water, and then use it to clean up the lines. Works great! Especially with semi-gloss paint (a must for kids!) – Danielle, Marysville, WA
Start with the biggest stencil. The barn was a focal point and it was also the hardest to even out on the wall because of the size. I am glad I did that first. – Amanda, St. Louis, MO
Make a fold on the edge of the stencil to make it easy to peel off and then press the stencil down really well to avoid the paint from bleeding. We were a bit cautious on our first stencil attempt and this is the one that needed the most touching up afterwards. – Rachel and Nick, Brighton, UK
We placed the stickers on the walls with scotch tape before permanently sticking them. – Leslie and Ted, Lenoir, NC
Watch the videos! I would have never thought to draw the hill with chalk first before painting it! Out of all the work we put into her room from flooring, to crown molding, painting, decorating, organizing, I was most nervous about the hill messing it all up! The videos give you confidence that it really IS that simple! – Alicia, Pearland, TX
I used the virtual mural maker to create a basic theme, then printed the picture and used my projector to place my concept drawing on the wall. Really helped! – Ann, Pasadena, MD
Take your time and don’t be afraid to move the stickers around if you need to. – Shelley, Ontario, Canada
First, I cut out each sticker and only left a little bit of the paper backing so the edges of the stickers wouldn't get bent. It was very helpful to use painter's tape to hang the balloons and clouds first. My mom and I wanted to get an idea of what they would look like and adjust them as needed. Once we were happy with the placement, we put a tiny pencil mark on the wall as a guide to line up the edge of the sticker. It was helpful to have 2 sets of hands when smoothing out the larger stickers, but certainly doable on your own. – Emily, Bayport, NY (We definitely recommend two sets of hand with larger decals.)
I think it’s easy to look at the pictures and think wow I don't think I could do that...but believe me you can! I thought it would be really hard...or that painting the walls would be too hard...both were a breeze...and so much fun! – Amy, Altoona, PA
Have Fun! Don't be afraid to move things around.... These stickers can be moved after a minute or a year! (We know because our daughter's stickers got taken down after 18 months on the wall and went up in our new house, as good as new!) – Allison, Calgary, Alberta, Canada (If you think you may want to bring your decals to a new home later, we recommend saving the backing paper in the mailing tube. But don't worry, if you forget, we do sell backing paper on our site!)
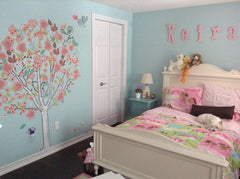
I did find a few interesting techniques that created some fun effects. For example, the green I chose for the tulip branches was challenging to saturate. After a couple of tries I started sweeping the sponge brush lightly up and down instead of going for complete saturation and it looked like it had the texture of a leaf, flawed and imperfect but with linear patterns. I also altered the direction of the butterfly stencil so that it would look like they were swooping up and down, dancing around the room in a graceful and varied pattern. – Amy, Annapolis, MD
There you have it, right out of the mouths of parents and grandparents who have been there and done that. If you’re still not sure you can tackle a room mural yourself, visit our video tutorials and customer gallery for inspiration. Or pick up the phone and call us or hit the chat with us button during business hours! We truly believe anybody can create a beautiful mural using our products and want to see you succeed. If you’ve used our products and have a tip to share please comment below.
Right now, use code GIVING25 to save 25% on all My Wonderful Walls wall decals and stencils and enter our fabulous giveaway to win any stencil kit or wall sticker up to $163. You might be one of two lucky winners!